Guide
Record your screen to give Seby feedback
Talk and point while you use the page. Five minutes of recording beats twenty minutes of typing, and it is the fastest way to tell your Seby team what to improve.
- Set up once Turn on click circles, and know where your recordings go.
- Record Whole screen, microphone on. Talk and point as you go.
- Hand it over Save it to your shared folder or paste the link into Chat with Seby Brain.
1. Set up once
About five minutes, and you only do it once.
A. Turn on click circles (Windows)
This draws a coloured circle every time you click, so Seby can see exactly what you pointed at. Works on Windows 10 and Windows 11.
- Install Microsoft PowerToys. It is free and made by Microsoft. Open PowerToys in the Microsoft Store and click Get (or Install).
- Open PowerToys from the Start menu.
- Find Mouse Highlighter in the list and switch it On (box 1 below).
- Note its shortcut, Windows + Shift + H, shown as "Turn on clicks highlighter" (box 2). It turns the circles on and off.
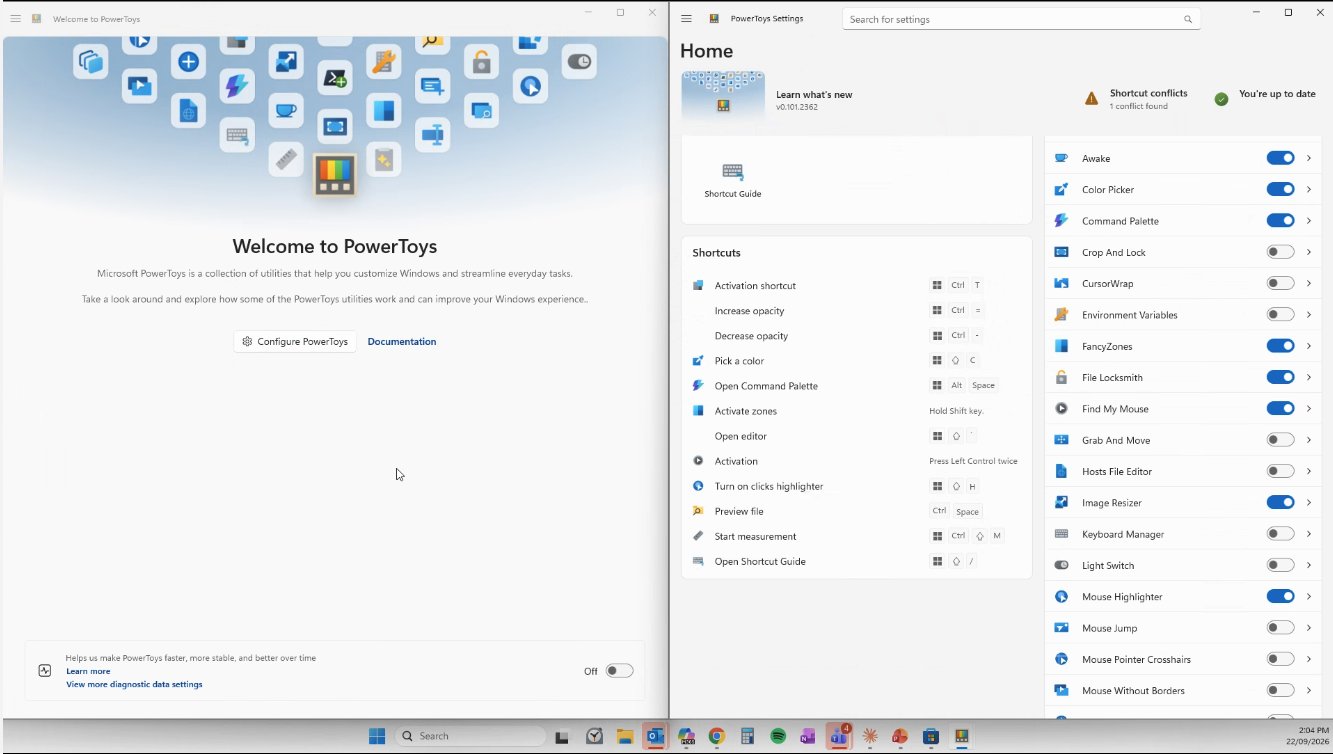 1 2
1 2 If the shortcut does nothing, open PowerToys Home and click Shortcut conflicts. It tells you which other app has the same keys. Pick a different shortcut for Mouse Highlighter and use that one.
On a Mac, the built-in recorder has this option already. See section 4.
B. Know where your recordings go
Your Seby team will have given you a shared folder for recordings, usually in OneDrive, SharePoint or Google Drive. Add it to your computer once (open the folder link, then Add shortcut to My files or Sync) so it shows in File Explorer or Finder. Not sure which folder? Ask in Chat with Seby Brain and it will tell you.
2. Record on Windows 11
Windows 11 records with the built-in Snipping Tool. Not sure which Windows you have? Open Snipping Tool: if you see a video camera icon next to the camera icon, you are on Windows 11. If you only see New, Mode and Delay, skip to section 3.
Before
- Open the page you want to give feedback on.
- Press Windows + Shift + H to turn click circles on. Click once somewhere blank to check a circle appears.
- Press Windows + Shift + R to start a Snipping Tool recording. (Or open Snipping Tool and click the video camera icon.)
- Drag the box over the whole screen, including the browser address bar at the top and the taskbar at the bottom. The address bar tells Seby which page you are on.
- Turn the Microphone ON. Turn System audio on too if the page plays sound.
During
- Click Start. There is a 3-second countdown.
- Talk and point (see how to talk).
- Click the red Stop button.
After
- The Snipping Tool window opens with your video. Click Save (the floppy disk icon, or Save as).
- Save it into your shared recordings folder. Keep the name it suggests, or add a short topic, for example "Recording 2026-09-25 143747 invoice filters".
- Press Windows + Shift + H again to turn click circles off.
3. Record on Windows 10
The Windows 10 Snipping Tool cannot record video, and Windows + Shift + R does nothing. Use Clipchamp instead. It is free, made by Microsoft, and captures the whole screen, your microphone and the click circles. You do not need Windows 11 for this, and on a work PC the upgrade is an IT job anyway.
One-time
- Install Clipchamp: open Clipchamp in the Microsoft Store and click Get (or Install). Open it and sign in with your work Microsoft account when it asks.
- Do the click circles setup in section 1 as normal. It works on Windows 10.
Each recording
- Open the page you want to give feedback on. Press Windows + Shift + H and click once somewhere blank to check a circle appears.
- Open Clipchamp. Click Create a new video, then Record & create in the left bar, then Screen (not Screen and camera).
- Turn the Mic on. Under the record button there are Camera, Mic and Script buttons. If the Mic icon has a line through it, it is off: click it, then use the small arrow next to it to pick your microphone. Say a few words and check the level moves. Then click the record button (it may say Start screen recording).
- Windows asks what to share. Click the Entire Screen tab, click your screen, then Share (or Share with Audio). Recording starts after a short countdown. Note: the Share with system audio switch only records sound coming out of your computer. It does not record your voice. Your voice comes from the Mic button in the step before.
- Talk and point (see how to talk). Keep it under 10 minutes. Clipchamp stops by itself at 30.
- Click Stop sharing at the bottom of the screen, then Save and edit.
- Click Export (top right) and choose 1080p. When it finishes, the video is in your Downloads folder.
- In File Explorer, drag the video from Downloads into your shared recordings folder. Rename it with a short topic if you like. Press Windows + Shift + H again to turn circles off.
4. Record on a Mac
- Press Cmd + Shift + 5.
- Click Options and tick Show Mouse Clicks. This is the Mac version of click circles.
- Under Options, pick your Microphone. It defaults to None, and a silent recording is a wasted recording.
- Choose Record Entire Screen, click, then talk and point.
- Stop from the menu bar (the stop icon) or press Cmd + Ctrl + Esc. The file lands on your Desktop unless you changed the save location. Move it into your shared recordings folder.
5. How to talk while you record
- Start with "Seby, …" so it is clearly a request."Seby, the filters on this page are confusing."
- Name the thing you are clicking. Say its name instead of "this one"."I'm clicking Everyone."
- Say the verdict out loud, and why."This is wrong because it shows two, and I expected all fourteen."
- Say if it is a one-off or a forever fix. "Fix this record" and "make it never happen again" are handled differently.
Keep each recording under 10 minutes. If you have more to say, stop and start a second one ("part 2").
- Record the whole screen, address bar included
- Check the mic is on before you start
- Name buttons, people and companies out loud
- Explain why something is wrong
- Split long feedback into several short videos
- Record just one window or a small box
- Point silently and say "this here"
- Send a screenshot instead (no sound, no clicks)
- Go past 10 minutes in one video
- Leave passwords or unrelated private windows open
6. Hand it to Seby
Open Chat with Seby Brain (in your Command Centre, Teams or Slack, wherever your team talks to Seby) and do one of these:
- Paste the link to the video. In File Explorer or Finder, right-click the video and choose Share or Copy link. Or open the shared folder in your browser and copy the link there.
- Or just type its name."Process my feedback video Recording 2026-09-25 143747"
Seby works through the video, lines up the fixes for your Seby team to review and build, and confirms with a link to the ticket. You hear back when each one is done.
Troubleshooting
| Problem | Fix |
|---|---|
| No circle when I click | Press Windows + Shift + H again. Check PowerToys is running (icon near the clock) and Mouse Highlighter is On. Still nothing: open PowerToys Home, then Shortcut conflicts, and choose another shortcut. |
| Snipping Tool has no video camera icon (only New, Mode, Delay) | That is the Windows 10 Snipping Tool, which cannot record video. Use Clipchamp: see section 3. To check your version, press Windows + R, type winver, press Enter. |
| Windows + Shift + R does nothing | On Windows 11, open Snipping Tool from the Start menu and click the video camera icon. On Windows 10, use Clipchamp (section 3). |
| No sound in the video | The microphone was off. In Clipchamp, the Mic button under the record button has a line through it when it is off, and "Share with system audio" does not record your voice. Turn the Mic on and record a 10-second test first. Check Windows is using the right mic (Settings › System › Sound › Input) or, on a Mac, that Options › Microphone is not None. |
| Only part of the screen was captured | Next time, choose Entire Screen, or drag the box from the very top-left corner to the very bottom-right so the address bar and taskbar are inside it. |
| Clipchamp export is huge or slow | Pick 1080p, not 4K. A 10-minute recording is normally under 500 MB. Wait for the export bar to finish before moving the file. |
| I can't find the shared folder when saving | Save to Videos for now, then open the shared folder in your browser and click Upload. Ask in Chat with Seby Brain if you are not sure which folder it is. |
| I closed the recorder without saving | Snipping Tool keeps a copy in Videos › Screen Recordings. Game Bar saves to Videos › Captures. Clipchamp keeps the project under Your videos, so open it and export again. |
FAQ
Who watches my video?
Seby processes it for your Seby team to turn your feedback into fixes. It is transcribed on the Seby team's own machine, not by an outside transcription service.
Do I need to write anything as well?
No. Talking over the screen is enough. A short topic in the file name helps if you save several.
What if I make a mistake mid-recording?
Just say "ignore that" and carry on. No need to re-record.
How long should it be?
Whatever it takes, up to 10 minutes. Two short videos beat one long one.
Do I need Windows 11?
No. Windows 10 works with Clipchamp (section 3). Upgrading a work PC is a job for your IT team and is not needed for this.
Can I record on my phone instead?
You can, but Seby needs to see the page you are talking about, so record on the computer where you use it.